From www.ModernBeats.com:
Out of the hundreds of reader questions we have answered during Hit Talk’s first year, perhaps none is more persistent than how to attain a hotter, better-mastered mix. It’s a persistent question because attaining a bold, big sound requires inspired production wizardry and skill at every single stage of the music-making process - from recording, to picking samples, to mixing and equalizing, right down to this tip’s topic: the final master.
Good mixing and good mastering require good monitoring, preferably with a properly-positioned 2.1 system. Maybe you’re skeptical, but you can tell when someone has mixed without a sub. Either they’ve overcompensated in the bass range, or they have no idea how flat their mixes are. So, be forewarned that this tip (and good production in general) requires quality monitoring. It’s also wise to familiarize yourself with Hit Talk’s online and email tips, as well as Hit Theory, to get a better sense for some of the processes that come before this final stage. With those qualifiers out of the way, here’s a tutorial illustrating what we consider a sound approach to mastering your final mix. You can follow these steps with any comprehensive software or hardware mastering set-up, but for this tip, we’re using IK Multimedia’s most praiseworthy T-RackS 3 deluxe mixing and mastering suite.
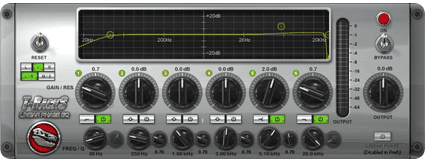
T-RackS Linear Phase EQ Settings
 No matter what gear you’re using to master your final mix, always start with the EQ. The first link in our signal chain is the new, and exceptionally transparent T-RackS Linear Phase EQ. Since we’re using a compressor and clipper later in the signal path, we’re going to bypass them for now, and slightly reduce the EQ’s output. Now we’re ready to audition the changes we’re about to make to the final mix’s frequency response.
Now, you may wonder “Why start with an EQ instead of a compressor?” It’s not an arbitrary decision. You start with the EQ because you’re going to be processing the signal with a low cut filter. You thereby drastically reduce the compressor load, giving it far more leeway to process the mids and highs. Above, you can see that the low cut filter starts to roll off at 38Hz. Now, while you might think twice about shaving off those precious bass frequencies, there’s a balance to be struck between bangin’ bass and hot, punchy compression. Ask yourself, how hot do I want the overall mix, and how heavy do I want the bass? You can’t have both. Typically 37-38 Hz is a good compromise between cutoff frequency and compressor output. Heavier production styles, like what you hear from Timbaland or Lil Jon, often have plenty of heavy bass elements, like 808-style kicks and deep analog bass timbres. In those cases 38Hz might be too much, so you have to be careful. Again, tri-monitoring is a must. Listen carefully with your subwoofer to strike that perfect balance.
Another factor to pay attention to while you’re tweaking your low cut filter is the slope of roll-off. The roll-off slope is illustrated above at the left side of the EQ’s display (see above.) If you’re using T-RackS 3, try using a range of 35Hz up to 41Hz, as we’ve done in the above illustration. However, if you’re using a different EQ, think of that range as a guideline, mainly because your roll-off slope could be steeper. A steeper roll-off means a more abrupt decibel drop below the cutoff frequency, so a 38Hz low cut filter on another EQ could make a much more drastic difference than in the T-RackS Linear Phase EQ.
Outside of using the EQ’s low cut, and as long as you have a good mix, the EQ should need little if any tweaking. At ModernBeats, when we master our product demos, we rely on our mixing skills to create a balanced frequency spectrum. If one demo needs it, we boost the treble range by small increments (between .5dB and 4dB - see above graphic). If you absolutely have to boost low or mid frequencies, make sure the linear phase EQ is set to “Linear Phase,” to keep EQ coloration to a minimum. As with any mastering process, you want this one to be completely transparent.
Transparent Master Compression
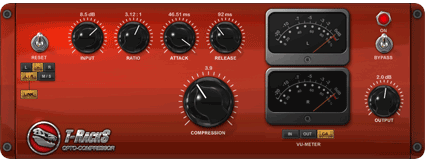
 Whenever mastering a final mix, the object is transparency and punch. Start with a modest compression ratio, about 3:1. If you’re trying to compress, not limit, a 3:1 ratio keeps the compression clean. Attack time should also be carefully managed for transparency. A fast attack will give you an artificially snappy sound. If you’ve mixed carefully, you’ll want to bring out the original snap and dynamics - all the good stuff you accomplished while mixing. If you go too slow on the attack (say, above 56ms) then the compressor just won’t react. The T-RackS Opto Compressor’s longest attack setting is 50ms, and usually we don’t pull it below 45ms, because the dynamics of the mix start to gain that artificial snap. Sometimes you have to use a fast attack while mastering to manage distortion and overdrive. If you’re hearing a lot of out-of-control peaks, often shortening the attack time can clean them up. Again, listen carefully and trust your ears.
Use a release time range of 84-105 ms. A longer release than that usually means that you’ll hear the compressor working. If you’re a dance or trance/goa producer, and you’re not averse to cliché, then by all means use a long release and savor the “boom-woaah, boom-woaah”. But if you’re producing urban and hip hop, keep your compression release respectably smooth. If your release is too short, you’ll hear distortion in the bass range; It’ll start to crackle. If your release is too long, the compressor will not recover and you’ll hear that pumping and breathing.
Next up is “input level,” (”input drive” in the T-RackS Classic Compressor.) You have to make sure your compression isn’t squashing your signal, and, in T-RackS, the best way to monitor the level of your compressor is by using the VU meter. While you’re playing back your song, look to see if the black VU meter averages around -5 dB. Generally, it shouldn’t dip down to -10. Watch it for a few seconds and get a visual idea of the signal’s average (RMS) level.
You may decide to swap the T RackS Opto Compressor with the Classic Compressor, which gives you a stereo enhancement option. Your best bet though is to set both compressor modules to equivalent settings and get an idea of which one suits your mix better. Regardless of the module you’re using, try following our guidelines above. If your mix is good, these techniques will make it shine all the brighter.
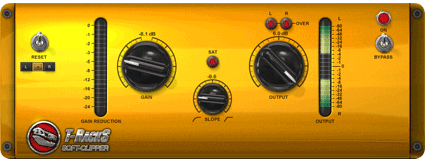
T-RackS Clipper Settings
 Our approach to the clipper is simple, and follows the logic of setting gain and volume on a mixer board channel strip. First, turn the slope and gain knob hard left. While keeping the slope knob all the way to the left, bring the gain knob up as high as you can without triggering any saturation.
Once you find the optimum gain, which should be fairly low because the compression gain will already be quite high, now turn the slope knob up until you find a timbre you prefer. Putting the slope knob right in the middle, at about a -6 setting should yield a nice, smooth saturation. You can’t really mess with the clipper until you’ve finished compressing and EQing. If you decide you need to tweak your compressor or EQ, turn the clipper off, and repeat the steps we just explained.
Some Final Bass Mastering Tips
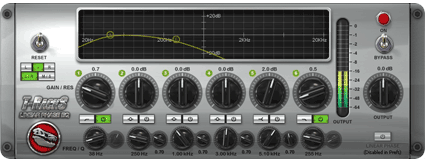
 Now that you have tweaked, pruned and polished the relevant parts of your mastering chain, take another look at the EQ. In the picture at left, we’ve taken the hi cut (or low pass) filter and swept it all the way down to 250Hz. Now don’t panic, we’re not suggesting you wipe out all of the mid/treble frequencies in your mix. You’re sweeping to 250Hz so that you can hear the bass frequencies in isolation. Hearing those bass frequencies on their own allows you to monitor for crackle.
If the bass is crackling, then the output of the EQ is too high. You can’t hear those rumbles and crackles if you’ve got guitars vocals and synths blaring over the top of them. You can afford a little bit of crackle, but too much of it can sap your mix’s tone. Once you’ve set the right output level, simply bypass the hi cut filter.
Experiment with Mixing and Mastering
With these guidelines, you can take your mixes from a dull shine to a glittering shimmer. Again, you still need all the elements of a catchy, well-mixed beat: properly managed frequencies, expansive stereo image, good composition, good arrangement, etc… No amount of mastering will ever replace mixing skill and musical creativity.Our final mastering advice is, simply, experiment. Like any of our advice, use this tip as a guideline, then take it in your own unique direction. For example, now that T-RackS 3 can be downloaded as a suite of independent VST plugins, you can create your own hybrid mastering process using any other set of mastering plugins. If you really want a distinguished sound, you might decide to route your final master through a hardware graphic EQ to shave off your bass frequencies, then back into your DAW for the final mastering stages. It’s up to you.
T-RackS 3 provides a convenient all-in-one suite incorporating the very best digital models of classic vintage mastering tools: one of the many reasons we used it for this tip. But, regardless of what plugins or hardware you’re using, if you’ve been looking for a fatter, fuller sound, a proper mastering regimen like the one we’ve outlined above is essential. Have it ready for action.

No comments:
Post a Comment