Here it is, the FLP remake of a song that a few of you have been requesting, straight from my man Illmatik.
Enjoy
http://www.megaupload.com/?d=O6BJ17AI
Sunday, November 7, 2010
Tuesday, November 2, 2010
*NEW* - ATL KIT - From Young Jeezy to Gucci Mane to more - Includes airhorn and mastering VST
Awesome kit, includes many of the sounds you hear in today's music. I can even give you references on specific sample use. For example, sound 134 in the percussions folder (a clap) is used by Drumma Boy in the hit song "Atlanta GA" by Shawty Lo (Feat. Ludacris, Gucci Mane, and The Dream).
ATL Kit Part One - http://adf.ly/2cmsj
ATL Kit Part Two (Accidentally uploaded it as part 3) - http://adf.ly/2cmvK
ATL Kit Part One - http://adf.ly/2cmsj
ATL Kit Part Two (Accidentally uploaded it as part 3) - http://adf.ly/2cmvK
Monday, November 1, 2010
A seasoned music afficionado gives his opinions on DAWs
Move to the Beat of a Different Drum Machine
By Alexis Simon AKA Printts A, as found on www.WarBeats.com
As a music producer and an overall musical enthusiast, I dabble in many forms of composing and arranging music. From using software to compose songs on sheet music, to arranging hip hop and r&b instrumentals, I have had my hands on good musical software.
Software is obviously cheaper than any hard ware that would do the same job. However, some applications are better suited for certain type of work, or certain genres of music. Such as FLStudio, this has been said to be only for Hip hop, r&b, and electronic music.
Before I plunge you head first into the research results, knowing what to look for in a DAW, digital audio workstation, can greatly expedite your search for which is best for you. My paper will both explain and demystify Digital Music Production, while attempting to find the best all around software for creating it.
According to a Sweetwater article, when looking for a good DAW, an engineer is essentially looking for how well it can handle: MIDI Sequencing, Audio Recording, Audio and MIDI Editing, and Mixing (DAW Software). A great DAW would have all of these capabilities, but in most cases developers concentrate on one particular aspect.
Starting with MIDI Sequencing, which is playing and interpreting MIDI data, usually sent via a MIDI controller. People interested in MIDI Sequencing are most likely producers or composers. MIDI data is used with VST’s, which is an acronym for Virtual Studio Technology. Most of the songs you hear on the radio, have been composed, arranged or recorded with MIDI sequencing.
For this purpose I have always used FLStudio, because its interface is highly conducive to a beginner’s progress. The learning curve associated with FLStudio is relaxed. This DAW has the best of both worlds since beginners can learn from it and, intermediate and advanced users can use it for more complex projects. I have been using FLStudio for more than five years, so I would never change the DAW I use, even though it is not necessarily the best for my area of concentration.
Based on a Sweetwater poll, most music engineers said Cakewalk Sonar was the best DAW for this job. Originally, Sonar was only a MIDI VST, so as it progressed and became a DAW Sonar was ahead of the ball in that aspect. Step Sequencer 2.0, a feature in the newest Sonar model, lets you create drum tracks, beats, bass, and synth lines with a click of the mouse. Also, the new “Per-step Probability” feature lets you add automatic variations, which makes the song sound more human and not as robotic, a very important component of songs. Sonar is also the only DAW with a “Matrix Mode” for viewing the MIDI data simultaneously. With these key features, it’s easy to see why Sonar is the king of both MIDI and MIDI editing (Cakewalk.)
When it comes to Audio Recording, I use Adobe Audition 3.0, but it is far from the best DAW, only the cheapest. Adobe Audition is however a more than adequate audio recording DAW. It supports up to 128 audio tracks, and record in 44.1 KHz CD quality sample rate. Although, if your sound card permits, you can record up to 96 KHz. Audition also comes along with many factory preset effects to apply to the recordings during the mixing and mastering process.
Audition is a fine piece of software however; the best DAW in terms of audio recording is Steinberg Cubase Sx. In Steinberg Cubase Sx, there are an unlimited amount of tracks to record on, giving you more leeway to perfect a project. Also all recordings done in Cubase are of the highest quality. “The award-winning Steinberg audio engine delivers a crystal-clear 32-bit floating-point resolution and 96 kHz sample rate, with a pristine sound quality that is the hallmark of the Cubase 5 music production experience. The next-generation audio engine includes true surround capability throughout, with each track and channel offering up to six discreet channels, ready for 5.1 surround”( Peerless Recording). With this high capacity for clarity in audio recording, Cubase is easily the best audio recording DAW.
The next category is Audio and MIDI editing, and for this I use both Adobe Audition and Reason 4.0. Reason is software similar to FLStudio, except Reason has better audio effects and automation settings. Automation is exactly what it seems to be, a setting that makes different events happen automatically in during your song. Audition does an ok job at audio automation, sand Reason does a great job, but according to the Sweetwater polls, they simply aren’t the best.
This particular DAW has long been the industry standard, since audio recording made the jump from analog to digital. Pro Tools is more than just a name in the music recording industry, it is the favored DAW.
Since most people use Pro Tools, collaboration is much easier, because all projects created in Pro Tools are saved as the same file. “Edit in a single window environment and you’ll realize that Pro Tools became the industry standard not only because of its power, but also because it’s the easiest production environment to learn and use. Easily add crossfades between parts or edit points, make sample-accurate edits, tweak automation, rearrange entire sections, and more — all from within the Edit Window. Pro Tools offers editing modes and tools to accommodate nearly every editing task you throw at it. Various editing modes allow you to move audio and MIDI elements with complete precision, while key navigation and specialized editing tools help you quickly move around your session and execute tasks instantly. For the ultimate efficiency, the Smart Tool automatically switches between the multiple edit tools, allowing you to stay focused on the task at hand” ( Editing and Mixing). Oddly enough Sweetwater says that Pro Tools is the best in both editing and mixing, which is probably why it is the industry standard. This DAW is extremely expensive, because it only works when a special audio interface that is made by Digidesign is connected to the computer.
Reviewing the different aspects of a great DAW, I’ve come upon the conclusion that the best approach to having the ultimate DAW is to use a program called ReWired, which acts as a virtual patching bay. This allows the user to use different DAW’s within other DAW’s, thus making the search for the perfect software unnecessary. However if the choice had to be reached, Digidesign’s Pro Tools would be the best DAW.
Sunday, October 31, 2010
From ModernBeats.com (An awesome website for any and all interested in modern music production)
I've been receiving several inquiries as to how one should go about mixing and mastering one's music. The following is an EXCELLENT excerpt from an article seen on www.ModernBeats.com. Regardless of whether or not you have the software they're using, you can still apply the principles they discuss to any mixing or mastering toolset.
From www.ModernBeats.com:
Out of the hundreds of reader questions we have answered during Hit Talk’s first year, perhaps none is more persistent than how to attain a hotter, better-mastered mix. It’s a persistent question because attaining a bold, big sound requires inspired production wizardry and skill at every single stage of the music-making process - from recording, to picking samples, to mixing and equalizing, right down to this tip’s topic: the final master.
Good mixing and good mastering require good monitoring, preferably with a properly-positioned 2.1 system. Maybe you’re skeptical, but you can tell when someone has mixed without a sub. Either they’ve overcompensated in the bass range, or they have no idea how flat their mixes are. So, be forewarned that this tip (and good production in general) requires quality monitoring. It’s also wise to familiarize yourself with Hit Talk’s online and email tips, as well as Hit Theory, to get a better sense for some of the processes that come before this final stage. With those qualifiers out of the way, here’s a tutorial illustrating what we consider a sound approach to mastering your final mix. You can follow these steps with any comprehensive software or hardware mastering set-up, but for this tip, we’re using IK Multimedia’s most praiseworthy T-RackS 3 deluxe mixing and mastering suite.
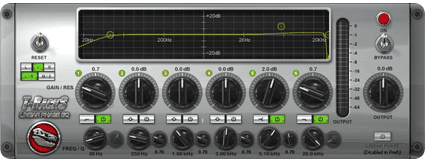 No matter what gear you’re using to master your final mix, always start with the EQ. The first link in our signal chain is the new, and exceptionally transparent T-RackS Linear Phase EQ. Since we’re using a compressor and clipper later in the signal path, we’re going to bypass them for now, and slightly reduce the EQ’s output. Now we’re ready to audition the changes we’re about to make to the final mix’s frequency response.
Now, you may wonder “Why start with an EQ instead of a compressor?” It’s not an arbitrary decision. You start with the EQ because you’re going to be processing the signal with a low cut filter. You thereby drastically reduce the compressor load, giving it far more leeway to process the mids and highs. Above, you can see that the low cut filter starts to roll off at 38Hz. Now, while you might think twice about shaving off those precious bass frequencies, there’s a balance to be struck between bangin’ bass and hot, punchy compression. Ask yourself, how hot do I want the overall mix, and how heavy do I want the bass? You can’t have both. Typically 37-38 Hz is a good compromise between cutoff frequency and compressor output. Heavier production styles, like what you hear from Timbaland or Lil Jon, often have plenty of heavy bass elements, like 808-style kicks and deep analog bass timbres. In those cases 38Hz might be too much, so you have to be careful. Again, tri-monitoring is a must. Listen carefully with your subwoofer to strike that perfect balance.
Another factor to pay attention to while you’re tweaking your low cut filter is the slope of roll-off. The roll-off slope is illustrated above at the left side of the EQ’s display (see above.) If you’re using T-RackS 3, try using a range of 35Hz up to 41Hz, as we’ve done in the above illustration. However, if you’re using a different EQ, think of that range as a guideline, mainly because your roll-off slope could be steeper. A steeper roll-off means a more abrupt decibel drop below the cutoff frequency, so a 38Hz low cut filter on another EQ could make a much more drastic difference than in the T-RackS Linear Phase EQ.
Outside of using the EQ’s low cut, and as long as you have a good mix, the EQ should need little if any tweaking. At ModernBeats, when we master our product demos, we rely on our mixing skills to create a balanced frequency spectrum. If one demo needs it, we boost the treble range by small increments (between .5dB and 4dB - see above graphic). If you absolutely have to boost low or mid frequencies, make sure the linear phase EQ is set to “Linear Phase,” to keep EQ coloration to a minimum. As with any mastering process, you want this one to be completely transparent.
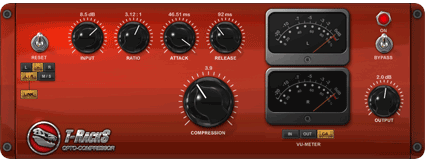 Whenever mastering a final mix, the object is transparency and punch. Start with a modest compression ratio, about 3:1. If you’re trying to compress, not limit, a 3:1 ratio keeps the compression clean. Attack time should also be carefully managed for transparency. A fast attack will give you an artificially snappy sound. If you’ve mixed carefully, you’ll want to bring out the original snap and dynamics - all the good stuff you accomplished while mixing. If you go too slow on the attack (say, above 56ms) then the compressor just won’t react. The T-RackS Opto Compressor’s longest attack setting is 50ms, and usually we don’t pull it below 45ms, because the dynamics of the mix start to gain that artificial snap. Sometimes you have to use a fast attack while mastering to manage distortion and overdrive. If you’re hearing a lot of out-of-control peaks, often shortening the attack time can clean them up. Again, listen carefully and trust your ears.
Use a release time range of 84-105 ms. A longer release than that usually means that you’ll hear the compressor working. If you’re a dance or trance/goa producer, and you’re not averse to cliché, then by all means use a long release and savor the “boom-woaah, boom-woaah”. But if you’re producing urban and hip hop, keep your compression release respectably smooth. If your release is too short, you’ll hear distortion in the bass range; It’ll start to crackle. If your release is too long, the compressor will not recover and you’ll hear that pumping and breathing.
Next up is “input level,” (”input drive” in the T-RackS Classic Compressor.) You have to make sure your compression isn’t squashing your signal, and, in T-RackS, the best way to monitor the level of your compressor is by using the VU meter. While you’re playing back your song, look to see if the black VU meter averages around -5 dB. Generally, it shouldn’t dip down to -10. Watch it for a few seconds and get a visual idea of the signal’s average (RMS) level.
You may decide to swap the T RackS Opto Compressor with the Classic Compressor, which gives you a stereo enhancement option. Your best bet though is to set both compressor modules to equivalent settings and get an idea of which one suits your mix better. Regardless of the module you’re using, try following our guidelines above. If your mix is good, these techniques will make it shine all the brighter.
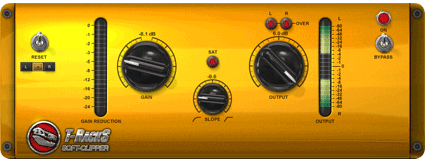 Our approach to the clipper is simple, and follows the logic of setting gain and volume on a mixer board channel strip. First, turn the slope and gain knob hard left. While keeping the slope knob all the way to the left, bring the gain knob up as high as you can without triggering any saturation.
Once you find the optimum gain, which should be fairly low because the compression gain will already be quite high, now turn the slope knob up until you find a timbre you prefer. Putting the slope knob right in the middle, at about a -6 setting should yield a nice, smooth saturation. You can’t really mess with the clipper until you’ve finished compressing and EQing. If you decide you need to tweak your compressor or EQ, turn the clipper off, and repeat the steps we just explained.
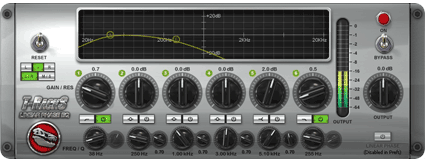 Now that you have tweaked, pruned and polished the relevant parts of your mastering chain, take another look at the EQ. In the picture at left, we’ve taken the hi cut (or low pass) filter and swept it all the way down to 250Hz. Now don’t panic, we’re not suggesting you wipe out all of the mid/treble frequencies in your mix. You’re sweeping to 250Hz so that you can hear the bass frequencies in isolation. Hearing those bass frequencies on their own allows you to monitor for crackle.
If the bass is crackling, then the output of the EQ is too high. You can’t hear those rumbles and crackles if you’ve got guitars vocals and synths blaring over the top of them. You can afford a little bit of crackle, but too much of it can sap your mix’s tone. Once you’ve set the right output level, simply bypass the hi cut filter.
Our final mastering advice is, simply, experiment. Like any of our advice, use this tip as a guideline, then take it in your own unique direction. For example, now that T-RackS 3 can be downloaded as a suite of independent VST plugins, you can create your own hybrid mastering process using any other set of mastering plugins. If you really want a distinguished sound, you might decide to route your final master through a hardware graphic EQ to shave off your bass frequencies, then back into your DAW for the final mastering stages. It’s up to you.
T-RackS 3 provides a convenient all-in-one suite incorporating the very best digital models of classic vintage mastering tools: one of the many reasons we used it for this tip. But, regardless of what plugins or hardware you’re using, if you’ve been looking for a fatter, fuller sound, a proper mastering regimen like the one we’ve outlined above is essential. Have it ready for action.
From www.ModernBeats.com:
Out of the hundreds of reader questions we have answered during Hit Talk’s first year, perhaps none is more persistent than how to attain a hotter, better-mastered mix. It’s a persistent question because attaining a bold, big sound requires inspired production wizardry and skill at every single stage of the music-making process - from recording, to picking samples, to mixing and equalizing, right down to this tip’s topic: the final master.
Good mixing and good mastering require good monitoring, preferably with a properly-positioned 2.1 system. Maybe you’re skeptical, but you can tell when someone has mixed without a sub. Either they’ve overcompensated in the bass range, or they have no idea how flat their mixes are. So, be forewarned that this tip (and good production in general) requires quality monitoring. It’s also wise to familiarize yourself with Hit Talk’s online and email tips, as well as Hit Theory, to get a better sense for some of the processes that come before this final stage. With those qualifiers out of the way, here’s a tutorial illustrating what we consider a sound approach to mastering your final mix. You can follow these steps with any comprehensive software or hardware mastering set-up, but for this tip, we’re using IK Multimedia’s most praiseworthy T-RackS 3 deluxe mixing and mastering suite.
T-RackS Linear Phase EQ Settings
 No matter what gear you’re using to master your final mix, always start with the EQ. The first link in our signal chain is the new, and exceptionally transparent T-RackS Linear Phase EQ. Since we’re using a compressor and clipper later in the signal path, we’re going to bypass them for now, and slightly reduce the EQ’s output. Now we’re ready to audition the changes we’re about to make to the final mix’s frequency response.
Now, you may wonder “Why start with an EQ instead of a compressor?” It’s not an arbitrary decision. You start with the EQ because you’re going to be processing the signal with a low cut filter. You thereby drastically reduce the compressor load, giving it far more leeway to process the mids and highs. Above, you can see that the low cut filter starts to roll off at 38Hz. Now, while you might think twice about shaving off those precious bass frequencies, there’s a balance to be struck between bangin’ bass and hot, punchy compression. Ask yourself, how hot do I want the overall mix, and how heavy do I want the bass? You can’t have both. Typically 37-38 Hz is a good compromise between cutoff frequency and compressor output. Heavier production styles, like what you hear from Timbaland or Lil Jon, often have plenty of heavy bass elements, like 808-style kicks and deep analog bass timbres. In those cases 38Hz might be too much, so you have to be careful. Again, tri-monitoring is a must. Listen carefully with your subwoofer to strike that perfect balance.
Another factor to pay attention to while you’re tweaking your low cut filter is the slope of roll-off. The roll-off slope is illustrated above at the left side of the EQ’s display (see above.) If you’re using T-RackS 3, try using a range of 35Hz up to 41Hz, as we’ve done in the above illustration. However, if you’re using a different EQ, think of that range as a guideline, mainly because your roll-off slope could be steeper. A steeper roll-off means a more abrupt decibel drop below the cutoff frequency, so a 38Hz low cut filter on another EQ could make a much more drastic difference than in the T-RackS Linear Phase EQ.
Outside of using the EQ’s low cut, and as long as you have a good mix, the EQ should need little if any tweaking. At ModernBeats, when we master our product demos, we rely on our mixing skills to create a balanced frequency spectrum. If one demo needs it, we boost the treble range by small increments (between .5dB and 4dB - see above graphic). If you absolutely have to boost low or mid frequencies, make sure the linear phase EQ is set to “Linear Phase,” to keep EQ coloration to a minimum. As with any mastering process, you want this one to be completely transparent.
Transparent Master Compression
 Whenever mastering a final mix, the object is transparency and punch. Start with a modest compression ratio, about 3:1. If you’re trying to compress, not limit, a 3:1 ratio keeps the compression clean. Attack time should also be carefully managed for transparency. A fast attack will give you an artificially snappy sound. If you’ve mixed carefully, you’ll want to bring out the original snap and dynamics - all the good stuff you accomplished while mixing. If you go too slow on the attack (say, above 56ms) then the compressor just won’t react. The T-RackS Opto Compressor’s longest attack setting is 50ms, and usually we don’t pull it below 45ms, because the dynamics of the mix start to gain that artificial snap. Sometimes you have to use a fast attack while mastering to manage distortion and overdrive. If you’re hearing a lot of out-of-control peaks, often shortening the attack time can clean them up. Again, listen carefully and trust your ears.
Use a release time range of 84-105 ms. A longer release than that usually means that you’ll hear the compressor working. If you’re a dance or trance/goa producer, and you’re not averse to cliché, then by all means use a long release and savor the “boom-woaah, boom-woaah”. But if you’re producing urban and hip hop, keep your compression release respectably smooth. If your release is too short, you’ll hear distortion in the bass range; It’ll start to crackle. If your release is too long, the compressor will not recover and you’ll hear that pumping and breathing.
Next up is “input level,” (”input drive” in the T-RackS Classic Compressor.) You have to make sure your compression isn’t squashing your signal, and, in T-RackS, the best way to monitor the level of your compressor is by using the VU meter. While you’re playing back your song, look to see if the black VU meter averages around -5 dB. Generally, it shouldn’t dip down to -10. Watch it for a few seconds and get a visual idea of the signal’s average (RMS) level.
You may decide to swap the T RackS Opto Compressor with the Classic Compressor, which gives you a stereo enhancement option. Your best bet though is to set both compressor modules to equivalent settings and get an idea of which one suits your mix better. Regardless of the module you’re using, try following our guidelines above. If your mix is good, these techniques will make it shine all the brighter.
T-RackS Clipper Settings
 Our approach to the clipper is simple, and follows the logic of setting gain and volume on a mixer board channel strip. First, turn the slope and gain knob hard left. While keeping the slope knob all the way to the left, bring the gain knob up as high as you can without triggering any saturation.
Once you find the optimum gain, which should be fairly low because the compression gain will already be quite high, now turn the slope knob up until you find a timbre you prefer. Putting the slope knob right in the middle, at about a -6 setting should yield a nice, smooth saturation. You can’t really mess with the clipper until you’ve finished compressing and EQing. If you decide you need to tweak your compressor or EQ, turn the clipper off, and repeat the steps we just explained.
Some Final Bass Mastering Tips
 Now that you have tweaked, pruned and polished the relevant parts of your mastering chain, take another look at the EQ. In the picture at left, we’ve taken the hi cut (or low pass) filter and swept it all the way down to 250Hz. Now don’t panic, we’re not suggesting you wipe out all of the mid/treble frequencies in your mix. You’re sweeping to 250Hz so that you can hear the bass frequencies in isolation. Hearing those bass frequencies on their own allows you to monitor for crackle.
If the bass is crackling, then the output of the EQ is too high. You can’t hear those rumbles and crackles if you’ve got guitars vocals and synths blaring over the top of them. You can afford a little bit of crackle, but too much of it can sap your mix’s tone. Once you’ve set the right output level, simply bypass the hi cut filter.
Experiment with Mixing and Mastering
With these guidelines, you can take your mixes from a dull shine to a glittering shimmer. Again, you still need all the elements of a catchy, well-mixed beat: properly managed frequencies, expansive stereo image, good composition, good arrangement, etc… No amount of mastering will ever replace mixing skill and musical creativity.Our final mastering advice is, simply, experiment. Like any of our advice, use this tip as a guideline, then take it in your own unique direction. For example, now that T-RackS 3 can be downloaded as a suite of independent VST plugins, you can create your own hybrid mastering process using any other set of mastering plugins. If you really want a distinguished sound, you might decide to route your final master through a hardware graphic EQ to shave off your bass frequencies, then back into your DAW for the final mastering stages. It’s up to you.
T-RackS 3 provides a convenient all-in-one suite incorporating the very best digital models of classic vintage mastering tools: one of the many reasons we used it for this tip. But, regardless of what plugins or hardware you’re using, if you’ve been looking for a fatter, fuller sound, a proper mastering regimen like the one we’ve outlined above is essential. Have it ready for action.
For XenelaBeatz - Reason: Wanna make better songz!
XenelaBeatz's question: Can u giv any tips for better beat layoutz?? thanX!
Here's a great video on the basic structure of a composition. Nice and simple, just kind of explains what the general idea is behind song layout. Should help you out a bit.
http://www.youtube.com/watch?v=ZKR65TyRakA&feature=player_embedded#!
Enjoy
Here's a great video on the basic structure of a composition. Nice and simple, just kind of explains what the general idea is behind song layout. Should help you out a bit.
http://www.youtube.com/watch?v=ZKR65TyRakA&feature=player_embedded#!
Enjoy
Saturday, October 30, 2010
For dTaurusdaman97 - Reason: I need fr paper plzz im in 8th grae helpp!
dTaurusdaman89's question: "What are generally the brightest things in the night sky?"
Quasars are generally considered to top the "brightest things in the universe" catagorey in terms of luminosity. Quasars, by the way are the distant centers of galaxys.
Here's a great article on the subject.
http://science.howstuffworks.com/dictionary/astronomy-terms/quasar-info.htm/printable
Hope this helps you write that thing man.
For JillWilliams - Reason: Curiosity
JillWilliams' question: Which constellations are near Ursa Major?
Ah, a question with a straightforward answer! Here's an alphabetical list:
-Boötes
-Camelopardalis
-Canes Venatici
-Coma Berenices
-Draco
-Leo
-Leo Minor
-Lynx
Ah, a question with a straightforward answer! Here's an alphabetical list:
-Boötes
-Camelopardalis
-Canes Venatici
-Coma Berenices
-Draco
-Leo
-Leo Minor
-Lynx
For goblu - Reason: My wife and I need some help here!
goblu's question: "My bank has approved me for a 2nd home condo in the Phoenix area. However, they say they are now concerned with the owner occupied/investor owned ratio in the area and say that the Fannie Mae will not approve. What's the deal here?"
Your situation, goblu, is quite common in communities where the board/overseeing group allows the number of rented units to overwhelm the number of owner-occupied units such that a percentage which is unacceptable to federal backers of mortgage loans and refinances is created.
This number changes over time, usually hovering around approximately 30% to 49% of the total number of units which can be rented.
Your option, if you want to purchase this unit in an overly rental-populated community, is to purchase it with cash. And unless the situation is corrected by the board/overseeing group over time, your only option when you sell may be that you can only sell to a 100% cash buyer.
A better choice may be to find a community with a rental cap which has not been exceeded, where you can purchase a unit and qualify for the loan you want without worrying about any of the mess described above. It's really up to you.
Hope this helps
Best of luck, my friend.
(Sample) For BananaGurl219 - Reason: My mom says I say it wrong
BananaGurl219's question: "What is the proper way to pronounce the word 'apple'?"
First, you say "aah," then you say "pull." When you do the "aah" part, stay away from the type of "ahh" that might escape you as you sink into a hot tub and shoot for more of the "ahh" that might escape you as you leap from a cliff. Once you've mastered these two complex sounds, put them together into a single word. That simple. Just remember to ignore any warm fuzzy feelings of success or achievement.
First, you say "aah," then you say "pull." When you do the "aah" part, stay away from the type of "ahh" that might escape you as you sink into a hot tub and shoot for more of the "ahh" that might escape you as you leap from a cliff. Once you've mastered these two complex sounds, put them together into a single word. That simple. Just remember to ignore any warm fuzzy feelings of success or achievement.
Ambient Nation is finally up and running!
Hello to all of my wonderfully inquisitve fans and followers! I've finally gotten this thing up and running, and aim to use it as a more public place to attempt to satisfy your curiosities and information-related needs. I'll now be taking emails with your questions and answering them in a post titled with the user's requested alias and the reason they wanted the info (which can range from "sheer curiosity" to "need it for a paper" to "I'd rather not say"). I'll be posting a sample response shortly!
Subscribe to:
Comments (Atom)
